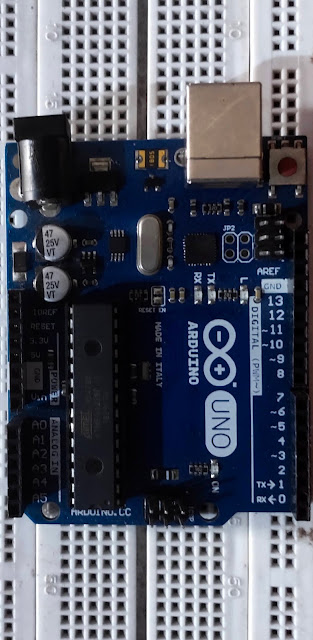
Arduino is an open hardware development board that can be used by any hobbyists to can interact with the real world. ts hardware products are licensed under a CC-BY-SA license, while the software is licensed under the GNU Lesser General Public License (LGPL) or the GNU General Public License (GPL permitting the manufacture of Arduino boards and software distribution by anyone. Arduino boards are available commercially from the official website or through authorized distributors.
How Arduino works?
Arduinos contain a number of different parts and interfaces together on a single circuit board. The design has changed through the years, and some variations include other parts as well. But on a basic board, you’re likely to find the number of the following piece of pins, which are used to connect with various components you might want to use with the Arduino. These pins come in two varieties:
- Digital pins, which can read and write a single state, on or off. Most Arduinos have 14 digital I/O pins.
- Analog pins, which can read a range of values, and are useful for more fine-grained control. Most Arduinos have six of these analog pins.
- A power connector, which provides power to both the device itself, and provides a low voltage which can power connected components like LEDs and various sensors, provided their power needs are reasonably low. The power connector can connect to either an AC adapter or a small battery.
- A microcontroller, the primary chip, which allows you to program the Arduino in order for it to be able to execute commands and make decisions based on various input. The exact chip varies depending on what type of Arduino you buy, but they are generally Atmel controllers, usually an ATmega8, ATmega168, ATmega328, ATmega1280, or ATmega2560. The differences between these chips are subtle, but the biggest difference a beginner will notice is the different amounts of onboard memory.
- A serial connector, which on most newer boards is implemented through a standard USB port. This connector allows you to communicate to the board from your computer, as well as load new programs onto the device. Often times Arduinos can also be powered through the USB port, removing the need for a separate power connection.
- A variety of other small components, like an oscillator and/or a voltage regulator, provide important capabilities to the board, although you typically don’t interact with these directly; just know that they are there.
How to set up Arduino?
STEP 1
Arduino microcontrollers come in a variety of types. The most common is the Arduino UNO, but there are specialized variations. Before you begin building, do a little research to figure out which version will be the most appropriate for your project.
STEP 2
To begin, you’ll need to install the Arduino Programmer, aka the integrated development environment (IDE).
STEP 3
Connect your Arduino to the USB port of your computer. This may require a specific USB cable. Every Arduino has a different virtual serial-port address, so you‘ll need to reconfigure the port if you’re using different Arduinos.
STEP 4
Set the board type and the serial port in the Arduino Programmer.
STEP 5
Test the microcontroller by using one of the preloaded programs, called sketches, in the Arduino Programmer. Open one of the example sketches, and press the upload button to load it. The Arduino should begin responding to the program: If you’ve set it to blink an LED light, for example, the light should start blinking.
STEP 6
To upload new code to the Arduino, either you’ll need to have access to code you can paste into the programmer, or you’ll have to write it yourself, using the Arduino programming language to create your own sketch. An Arduino sketch usually has five parts: a header describing the sketch and its author; a section defining variables; a setup routine that sets the initial conditions of variables and runs preliminary code; a loop routine, which is where you add the main code that will execute repeatedly until you stop running the sketch; and a section where you can list other functions that activate during the setup and loop routines. All sketches must include the setup and loop routines.


0 Comments